Understanding Paper Fluorescence - Advanced Version

Overview

Probably no topic causes more confusion for collectors than the study of paper fluorescence. Many feel that there is too much subjectivity involved in evaluating and studying paper fluorescence and there is a tremendous amount of inconsistency among the stamps listed in Unitrade. Indeed many of the stamps listed are described as having the same degree of fluorescence, but appear completely different under the UV lamp. This makes positive identification of single stamps next to impossible for those unfamiliar with the papers, unless the varieties are unmistakably obvious.

This article will attempt to explain why this confusion arises and break the topic down into more manageable components, so that you will be able to see that the study of paper fluorescence is not impossibly complex. Please note that this is the complicated, more advanced article on this topic. If you have never studied paper fluorescence before, or you do not wish to get too far into detail, then it is recommended that you read the basic version of this article here.

The Cause of Confusion and Basic Grades of Fluorescence

The subject of paper fluorescence is confusing because many of the papers used contain fibres in varying densities that react differently to the UV lamp than the main paper. In addition, the use of paper coatings in the early 1970's has resulted in many papers that give different reactions on the face of the paper from the back.

To begin with it is important to understand the basic levels of fluorescence and what they look like:

  1. Dead paper (Dead) - 0 on the Irwin scale
  2. Non-Fluorescent (NF) - 1 on the Irwin scale
  3. Dull Fluorescent (DF) - 2-3 on the Irwin scale
  4. Low Fluorescent (LF) - 3-4 on the Irwin scale
  5. Fluorescent (F) - 5-6 on the Irwin scale
  6. Medium Fluorescent (MF) - 7-8 on the Irwin scale
  7. High Fluorescent (HF) - 9-10 on the Irwin scale
  8. Hibrite (HB) - 11-12 on the Irwin scale

The Centennial specialists Irwin, Keane and Hughes came up with a 0-12 point brightness scale in the early 1970's. The numbers next to each grade represent where on the scale the grade falls.

Dead, Non-fluorescent and Dull Fluorescent Papers

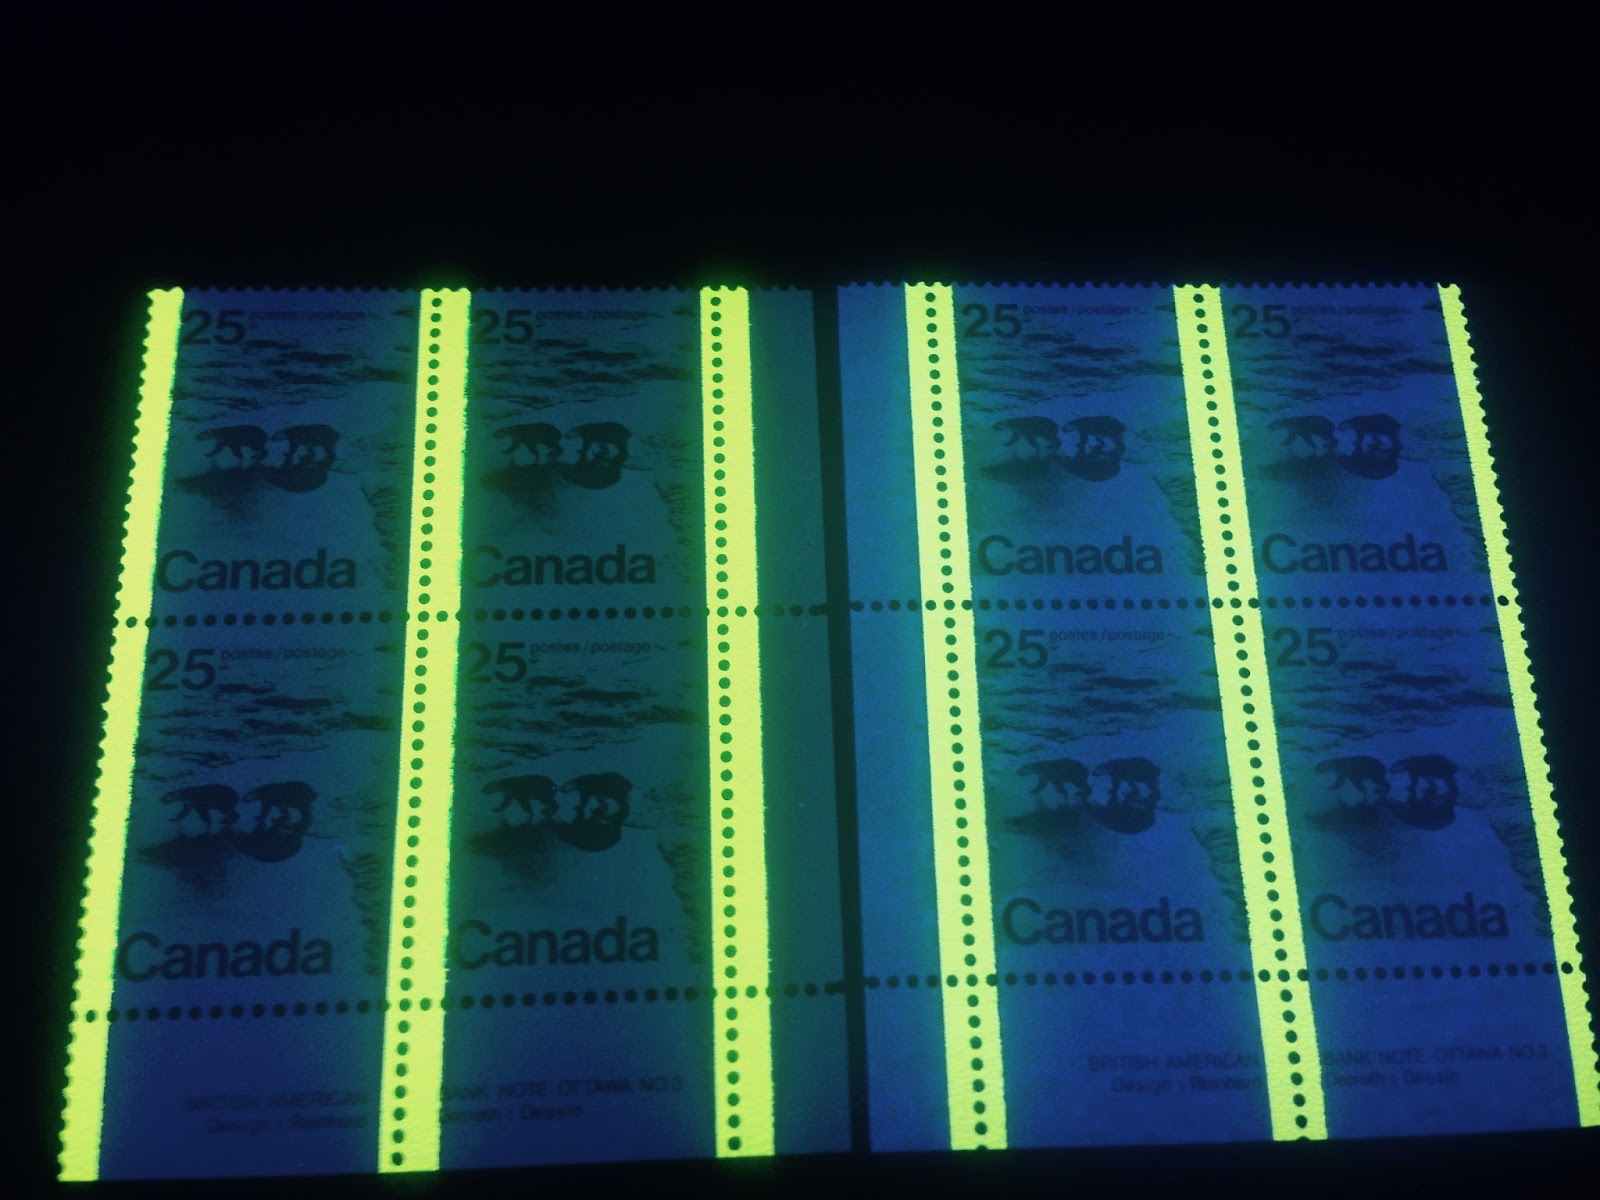
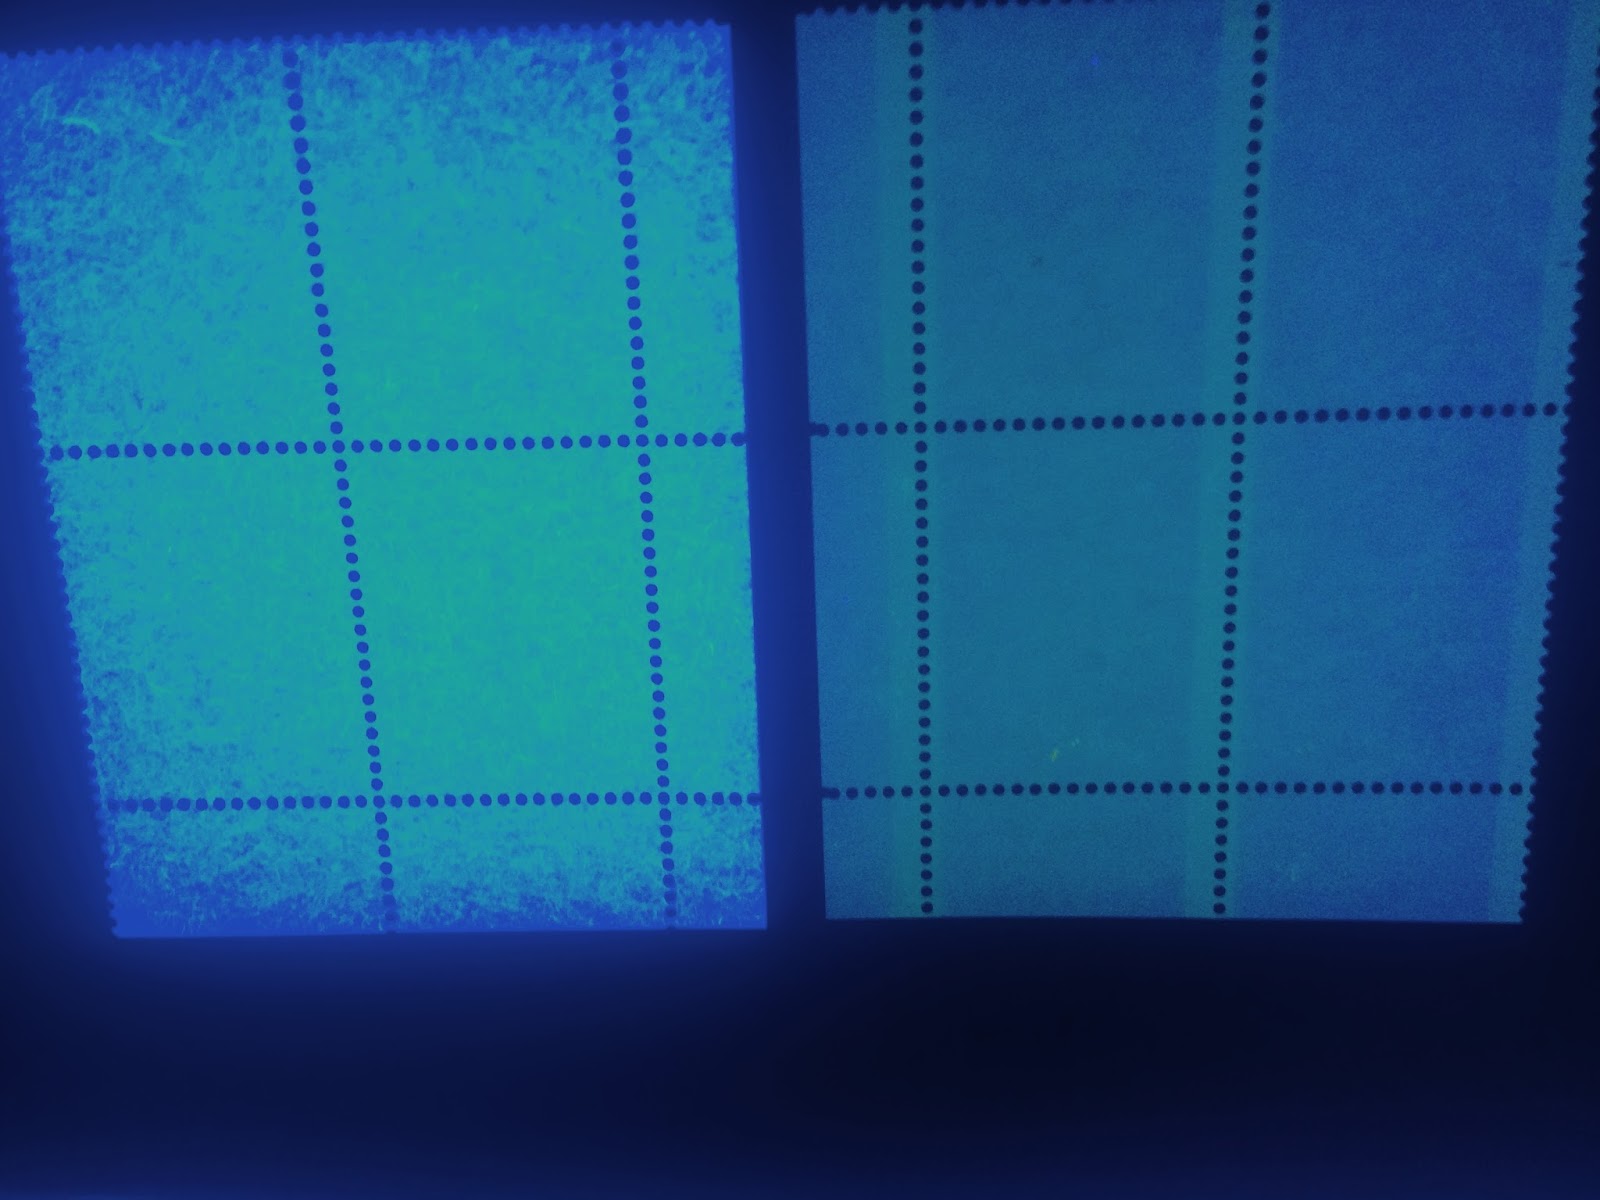
The picture taken with my I-phone camera shows the three lowest grades of paper fluorescence: dead, non-fluorescent (NF) and dull fluorescent (DF):

Dead, non-fluorescent and dull fluorescent papers

Dead paper either appears dark violet, dark brown, dark grey, or dark blue grey under the UV lamp. There is no bluish white or white glow whatsoever. This paper absorbs light and reflects none. True dead paper prior to the early 1990's is rarely seen. Much more common is NF paper. The stamp on the left is printed on dead paper.

NF paper appears a lighter brown, lighter grey, lighter blue grey or lighter purple. Again it absorbs almost all light gives off very little glow at all. The main difference between NF and dead paper is in the depth of colour that the viewer sees. The stamp in the centre is NF.

DF paper is the most common paper type prior to the Centennial issue. This paper type varies quite a bit in colour under UV, but generally, it gives off a very dull, bluish, greyish, light violet, ivory or greyish white appearance. It will not have the brownish or violet appearance of the NF or dead papers. It will not appear to be at all fluorescent, but compared to the above 2 types it looks quite a bit brighter. The stamp on the right is DF.

It is important to note that fluorescence refers to the brightness of the reflected light, not the colour. DF paper can come in several different types, each of which reflects a different colour under UV:

  • Greyish white
  • Greyish
  • Ivory
  • Bluish white
  • White
  • Yellowish ivory
  • Light violet

These are some of the colours I have seen. The difficulty for the average collector is that it is very easy to mistake the bluish white or greyish white DF paper with fluorescent paper if the person has never seen true fluorescent paper. This is especially the case if you are used to seeing NF paper.

Low Fluorescent Paper

The picture below shows the comparison between a stamp on dull fluorescent paper, and one on low fluorescent paper:

Dull fluorescent and low fluorescent papers

LF paper generally gives off a dull bluish white, greyish white or white glow. There is generally no brown, no grey and no violet in the colour. The stamp on the right is on low fluorescent paper, while the stamp on the left is on dull fluorescent paper. As you can see it appears bluish white in colour and not grey, like the stamp on the left.

Medium Fluorescent Paper

The picture below shows a comparison between the stamp printed on low fluorescent paper, shown above, and a similar stamp that is printed on medium fluorescent paper:

Low and medium fluorescent papers

Now here in this picture the stamp on the left looks just as dull as the stamp on DF paper did in the previous example. But that is because it has been placed next to a stamp on medium fluorescent paper. So, it appears greyish by comparison. MF paper appears almost exclusively bluish white, though it is not especially bright, but does not contain any brown, violet or grey. The stamp on the right is printed on medium fluorescent paper.

High Fluorescent Paper

Next up on the scale is high fluorescent. The picture below shows the difference between the stamp printed on medium fluorescent paper, as shown above, and another one printed on high fluorescent paper:

Medium and high fluorescent papers

The stamp on the left is the same stamp as was shown in the previous example, on the medium fluorescent paper. The stamp on the right is printed on high fluorescent paper. As you can see, the colour is pure bluish white, but it is not maximum brightness. There is still room for the colour to be brighter.

Hibrite Paper

The brightest paper is of course hibrite. It is always a bright, bluish white colour. The picture below shows two stamps that are printed on HB paper, each of a slightly different brightness level:

two examples of hibrite paper

True hibrite paper is quite unmistakable in its appearance. Once you have seen it, there is no confusing it with any of the other grades of fluorescence.

Fluorescent Fibres In The Paper and Naming Convention

What complicates the picture is that in addition to the basic grade of the paper, there are often found, fibres which show a different level of fluorescence from the overall paper. These fibres can be very dense, to the point where you can barely see individual fibres, right down to very few, where there are only 1-5 fibres visible on the entire stamp. Often these fibres can fool collectors into thinking that a paper is more fluorescent than it actually is. The pictures below show some stamps with different densities of fluorescent fibres, of varying brightness in the paper:

Sparse low fluorescent fibres

This paper is a non-fluorescent paper that contains a sparse concentration of low fluorescent fibres. As you can see the brighter fibres are evenly spread throughout the paper, with large 2-3 mm gaps where there are no fibres.

Low density concentration of medium fluorescent fibres

Here, we have a stamp on MF paper and if you look closely, you can see a denser mass of brighter fibres. This is a low density concentration of medium fluorescent fibres, that raises the overall perceived fluorescence from low fluorescent to medium fluorescent.

Medium density concentration of high fluorescent fibres

Here, we have a stamp on high fluorescent paper, that contains a medium density concentration of high fluorescent fibres. With this density, you can still see the individual fibres, but the spaces between the fibres are less than 1 mm.

Now, it is possible to have more than one brightness level of fibre and each of these can be a different density. So, for example a stamp may contain a low density concentration of fibres overall, but upon close examination with a 10x loupe, you can see that this density is made up of (1) a sparse concentration of low fluorescent fibres, and (2) very sparse concentrations of medium and high fluorescent fibres.

To deal with this, I have devised a naming convention as follows:

(basic fluorescence-fl, fluorescence of the fibres in the paper, concentration of said fibres)

So a stamp that had a basic fluorescence of DF, that has a high concentration of low fluorescent fibres would be abbreviated as follows:

(DF-fl, LF, HD)

For concentrations, I recognize six different levels of concentration as follows:

  1. Very few (VF) - no more than 1-5 fibres across the whole surface of the stamp.
  2.  Very sparse (VS): 5-10 fibres across the stamp with no discernible pattern.
  3. Sparse (S): a very light sprinkling of fibres across the entire stamp. Gaps where there are no fibres will be quite large - as much as 2-3 mm.
  4. Low Density (LD): the entire stamp is covered in fibres, but there areas with no fibres evenly distributed throughout that are up to 1 mm.
  5. Medium density (MD): the spaces between the fibres are smaller than 1 mm, but the fact that the fibres are individual is still very clear.
  6. High Density (HD): there are so many fibres in the paper that the fluorescence almost appears uniform, but under close inspection it is possible to make out individual fibres. However the gaps between fibres are extremely small.

Now it is the case that some stamp papers contain more than one grade of fluorescent fibre, as explained above. This explains situations where you have two stamps with fibres that appear to have the same overall fluorescence, but look different when you compare them to one another. To name these varieties, I simply add another two sets of initials for the second type for fibre, and more sets for each type of fibre present in the paper. So for example, a DF paper that contains a low density of LF fibres and a sparse concentration of MF fibres would be named as follows:

 (Df-fl, LF, LD, MF, S)

Paper Coatings, Different Readings on Front and Back and Impact on The Naming Convention

With the advent of chalk coatings that began to be added to papers starting in 1970, the subject of paper fluorescence becomes much more complicated because often the reaction of the front of the stamp will differ from the back. The pictures below illustrate this for the 25c Polar Bears definitive from 1976:

The two blocks shown here appear different on the front, with the left block appearing to be NF and the right block appearing to be LF.

However, when viewed from the back, these papers look completely different, in terms of their fluorescence level:

The block that was on the left in the last picture appears on the right here. The back looks closer to a pure DF greyish colour than the NF colouring that we saw from the front. The block that was on the right, now appears on the left, and it has a very dense concentration of high fluorescent fibres that border on hibrite.

So, the chalk coating has the effect of dampening the fluorescent effect. The naming convention will thus have to be modified to allow the back and the front of the stamp to be differentiated where the reaction on the front differs from the back. This is done by means of a slash. Everything to the left of the slash refers to the front of the stamp or multiple and everything to the right refers to the back.

So these two blocks would be named as follows:

The left block in the first picture would be: NF/DF

The right block in the same picture is: DF-fl, LF, LD/DF-fl, HF, LD, MF, LD

What is interesting here is that the second block actually has two different types of fibres, only one of which can be seen from the front. The reason I know there are two is that on the back the overall density appears to be MD. But then looking at the front there is a lot of space consistent with MD. The reason for this difference is that the MF fibres that are visible from the back are not bright enough to show through the front. If there is only one type of fibre present, then the concentration will either be the same on the front and back, or visible on the back only, but not the front.

Finally, there also exists a chalk-surfaced paper during the 1972-1976 period which comes with either a smooth surface, a distinct vertical ribbed surface and a distinct horizontal ribbed surface. The reactions of this paper under UV light are quite varied, but there is a DF paper which shows very clear woodpulp fibres on the back under UV. The descriptions of these stamps will include the initials WP for the word "woodpulp" after the initials describing the paper fluorescence.

The picture below shows an example of this paper type on the 1972 Plains Indians issue:

If you look toward the top of the picture you can see dark fibres. Those are the woodpulp fibres. Rather than show up brighter under UV, they show up darker, and are only visible under the UV lamp.

I recognize that this is very complicated and may appear at first to be too complicated to be workable. However, I believe breaking it down like this will take much of the subjectivity out of the study of paper fluorescence and introduce a bit more objectivity. Like anything, it simply takes practice in applying it to become comfortable with it.

More Examples

BK74, which is the 25c booklet from the 1972-1978 Caricature Issue has covers which display the full range of fluorescence levels and can be compared to gain a better sense of the differences between fluorescence levels:

Dull Fluorescent versus non-fluorescent

Here we have non-fluorescent card stock in the top booklet and dull fluorescent on the lower one. Note how non-fluorescent does not appear white at all, but looks greyish. Dull fluorescent looks white under UV, but is not bright in appearance.

Low fluorescent and dull fluorescent

Now we have a low fluorescent cover on the top booklet and the same dull fluorescent cover from the previous example on the bottom. Low fluorescent is the first grade of fluorescence that will read as fluorescent to your eyes on its own. It will usually be quite bluish or violet in colour, but will be very clearly not dull.

Low fluorescent and medium fluorescent

Here, low fluorescent is on top and medium fluorescent is on the bottom. The difference appears to be quite subtle here, because the medium fluorescent cover shown here is at the lower end of the medium fluorescent scale.

Medium and high fluorescent

Here we have medium and high fluorescent covers. Medium fluorescent is of course shown on the bottom, and covers a wider range on the Irwin scale than high fluorescent. Generally high fluorescent paper appears extremely bright bluish white, and without experience with hibrite paper it is easy to misidentify it as hibrite. However, when compared next to a true hibrite paper, the difference is quite striking still:

Hibrite versus high fluorescent

Here, the high fluorescent cover is shown on the bottom of the picture and it is hard to believe that it is the same cover as the one in the picture immediately above. Hibrite paper covers a range of two levels on the Irwin scale, levels 11 and 12. So it is common to come across two different, though very similar levels of brightness when working with hibrite paper.

Now, just for fun, here is a comparison shot of the hibrite paper next to the non-fluorescent paper on this booklet:

Non-fluorescent versus hibrite

In addition to paper fluorescence, there is the issue of ink fluorescence. This does not come up often, but occasionally you will find items where the ink used can be of both non-fluorescent and fluorescent types. It just so happens that the cover designs of the above booklets exist printed using a fluorescent ink, in addition to the non-fluorescent ink. The picture below shows the difference between these two inks under UV light:

Fluorescent and non-fluorescent ink

The cover at the top is printed in a fluorescent ink that glows orange-red under UV light, while the booklet at the bottom shows the normal non-fluorescent ink.