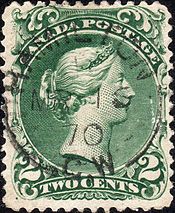
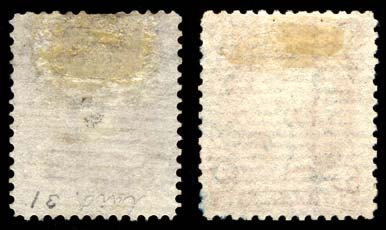
The laid paper, it turns out was an error: it is thought that a few sheets of laid paper that was normally used to prepare postal stationery envelopes got into the supply of paper that was used for the 1c, 2c and 3c stamps. This accounts for why until just a few years ago there were only two known examples. The example shown above was discovered by a collector in a club circuit book. The stamp is extremely valuable and sold for well into the low 6 figures. So, it is definitely useful to be aware of the differences that exist in a stamp's paper, and to know how to identify them.
We have covered the why. But what about the how and what? What can you study when you look at paper? Well, you can study the following attributes:
- Whether the paper is machine made or handmade.
- Whether the paper is wove, laid, batonne, granite, or silk thread paper.
- The direction of the paper weave, i.e. horizontal or vertical.
- Whether or not any mesh pattern is visible in the paper.
- The thickness of the paper.
- The colour of the paper.
- The degree to which the paper gives a fluorescent reaction under ultraviolet (UV) light.
- The surface porosity of the paper on the printing side, and whether the paper has been coated with any sizing compounds to make the ink adhere better.
- Whether the paper is opaque, translucent or transparent.
Generally most stamp paper from the majority of countries is machine made wove paper. However, there are some countries that continued to use hand made paper until well into the 20th century. Generally handmade paper will have a thickness that is much less even, and will lack the fine, processed look of machine made paper.
In addition to wove papers, one can find laid paper like that shown above, as well as Batonne, which is similar to laid. Granite paper is paper that contains coloured fibres that stand out, and finally, silk thread paper contains either a single silk thread or multiple threads.
The direction of the paper weave is usually indicated by the direction of the mesh, or the visible "grain" in the paper when there is one visible. However, there are many instances in which there is no visible grain. Sometimes in these cases you can see the grain by taking the stamp and holding it up to a strong light source, often referred to as back-lighting. But even then, sometimes no grain is visible. In these cases you can determine the direction of the paper weave by very gently bending the stamp between a thumb and middle finger, or index finger and seeing which direction bends with the least amount of resistance. The side that gives the least resistance is the direction of the weave.
Paper thickness can be most accurately measured using a micrometer, which is generally calibrated in one-thousandths of an inch. Most papers are 3 to 4 one-thousandths of an inch thick. Thick papers may be 5-7 one thousandths, while thin papers are generally 1-2 one thousandths of an inch thick. Micrometers used to be very expensive, and Lighthouse still sells theirs for a few hundred dollars. But, you can find models manufactured in China for just $10-$20, that will work just fine for what you need to do.
Most paper is white or cream in colour, but occasionally you will come across bluish, greyish, brownish, pink and yellowish papers. These colours can be very significant and differences in colour can translate into large price differences. Often, the differences can be very subtle and not obvious at all. An example that stands out are the bluish papers on the US Washington Franklin issues, which can easily be overlooked if you are not familiar with them. Even within white papers, there are sometimes differences in the degree of whiteness that mark a definite shift in a printer's supply of paper, and are thus philatelically significant. The best example I can give of this is the switch that the post office in Great Britain made in 1962 to a white paper from the earlier cream paper. It was a deliberate replacement, and hence it gave rise to a collectible difference in the paper of two otherwise identical stamps.
The fluorescence of paper is a topic for the philatelist interested in modern issues, as it does not really become a thing until the 1960's. It is a very complex topic, and one that I discuss in detail on the page titled "In a Different Light - Understanding Paper Fluorescence".
The surface porosity is a useful characteristic for distinguishing between high quality and lower quality wove papers, which in turn can help identify the printing from which a stamp comes. The best example I can think of is the Small Queen issue of Canada. The surface porosity of the paper used to print the stamps is one of the most reliable characteristics to use in identifying the first Ottawa printings, Montreal printings and second Ottawa printings.
To check surface porosity, you simply examine the printing surface of the paper under 10x magnification and note whether or not you can see loose fibres and pores, or whether it appears perfectly smooth and impervious. If the paper has a surface coating, this will generally show up as either an overly matte surface, or as a sheen. On some modern issues, printings can be found on porous and non-porous papers, as well as coated and uncoated papers.
Opacity of paper can also be another characteristic that is used to distinguish common printings of stamps from their scarcer counterparts. Opaque papers are those though which no portion of the design is visible when viewed from the back, face down on a flat surface. Most stamps are printed on opaque papers. The degree of opacity varies and some very opaque papers can give the appearance of being thicker than they really are.
Translucent papers are those through which you can clearly see many elements of the design when viewed through the back, but not all the details. These would generally be very thin wove papers. Transparent papers are rare, and generally confined to pelure papers and Goldbeater's skin, which were used on some early stamps of Prussia. On these papers the entire design is visible through the paper. In the case of the Prussian Goldbeater's skin issues, the paper was so transparent that the design was printed on the back, underneath the gum, in reverse, so that it would appear as normal from the front of the stamp.
Hopefully, this gives you some greater appreciation for the differences in paper that can be found and gives you a reason to pay closer attention to them.


