
Today's post will examine the coil stamps that were produced for this issue. Generally, coils were only produced for the first, second and third class local, and forwarded letter rates. Prior to this issue, most coils were sold in vending machines, but starting in 1969, with the 6c orange, coils were produced in rolls of 100 and sold to the public in this form, with free plastic dispensers.
The coil stamps were all printed by the Canadian Bank Note Company. They can generally be divided into two groups:


It is very, very slight, but if you look carefully at this strip, you can see that the left margin of the top pair in the strip is very slightly wider than the left margin of the bottom pair. Here is a closer look:


Here is a close-up of the dot above "AG":
Here is a close up of the "dot below P".


The coil stamps were all printed by the Canadian Bank Note Company. They can generally be divided into two groups:
- The initial issue printed in imperial dimensions, which consisted of the 3c, 4c and 5c. These were printed in rolls of 500 stamps each, with starter strips at the front of each roll that consisted of 10 blank, stamp sized cream coloured labels. On the end of the roll, after the 500th stamp, would be an end strip consisting of 10 stamp sized blank, coloured labels. The colour could vary (yellow on the 3c and pale red on the 4c for instance). The denomination of the stamp was usually handstamped on one of these labels, in dark purple.
- The metric issue, which consisted of the 6c orange, 6c black, 7c and 8c. These were issued in rolls of 100, which had no start or end strips.
The reason why the coils are best studied in this way is that the method of production differed completely between the two groups. Hence, the nature of the varieties that can be collected also differs:
- The imperial sized coils were produced by joining long rolls of stamps together to form rolls of 500 stamps. The rolls were produced from more than one revolution of the printing cylinder, which is why jump pairs and strips exist. The joining of the rolls together creates paste-ups. The strips themselves were cut from larger sheets and guide markings were placed in the margins between the strips to aid in placement of the cutting mechanism. Slight mis-alignments create cutting guideline strips.
- The metric sized coils were produced in sheet form first, rolled into rolls of 100 stamps, and then those rolls were scored between the rolls, with each roll being snapped off along the score lines. The rolls were wrapped and the wrapping contained printed text saying "Roll-Pac" with the denomination. The wrapping was also scored where the rolls were to be snapped off. Entire tubes would be shipped to post offices, where the clerks would snap them apart before selling them to the public.
The Initial, Imperial Size Coils
The Basic Designs
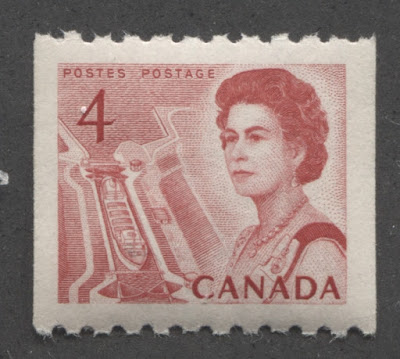
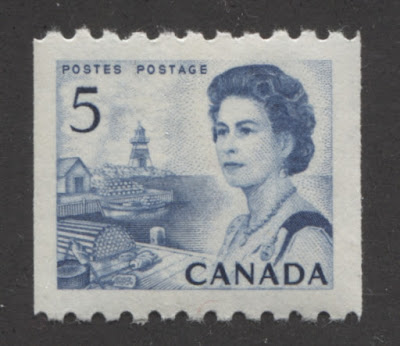
The initial issue was released on the same day as the sheet stamps, being February 8, 1967. The initial issue consisted of a 3c for the third class rate, a 4c for the local letter rate and a 5c for the forwarded letter rate. Exact issue quantities are not known.

3c deep rose lilac - combine harvester and oil rig.

4c scarlet red - seaway lock.

5c bright blue - Atlantic fishing village.
Cutting Guideline Strips


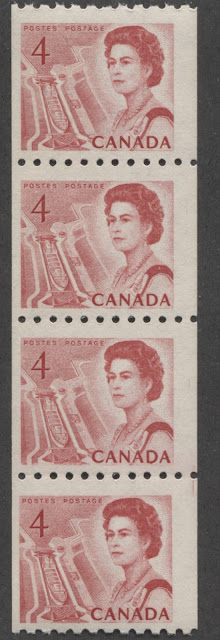
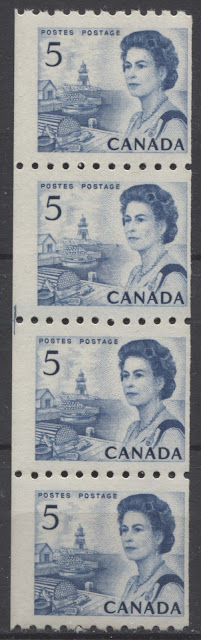
The above scan shows two strips of the 4c and 5c, where the cutting guideline is visible in the right margin and left margins respectively. As stated in Unitrade, the strips must be off centre in the horizontal direction in order for these lines to be visible. On the 4c strip, the line is visible in the right margin between the two bottom stamps, while on the 5c strip the marking is visible in the left margin between the two middle stamps. On the 4c strip, the marking appears to be a single vertical line, whereas it appears different on the 5c. Let's take a closer look at the 5c marking:
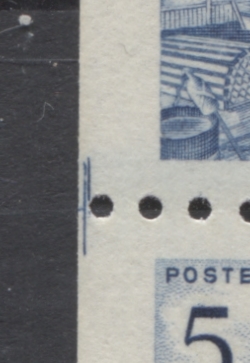
Here we can see that the marking is actually two separate markings:
- There is a short vertical line printed in a darker shade of blue,
- and then a wider, "T" shaped marking beside it.
Unitrade does not distinguish between these two different markings, nor do they list these as pairs rather than strips. I am not sure why it is customary to collect these as strips of 4, when singles or pairs can show these markings just as clearly as a strip can. However, they are listed for all three values. Unitrade does not list them for the different paper varieties, though they conceivably do exist, or can exist for all varieties of paper, gum and shade that exist for these.
Repair Paste-ups
Although they are called repair paste-ups, there is no evidence to suggest that these necessarily result from repairs to the strip. These were sold in rolls of 500, and it seems very unlikely to me that a continuous roll of 500 stamps would have been printed. What seems much more plausible, is that there would have been five rolls of 100 stamps joined together to form the larger roll, with additional paste-ups done where a roll came apart for some reason. So I would expect that a complete roll would contain at least five paste ups. Unfortunately I do not have access to a complete roll of coils to be able to test this theory, but when I do finally get access to one and can take it apart, I will be sure to update this post accordingly.
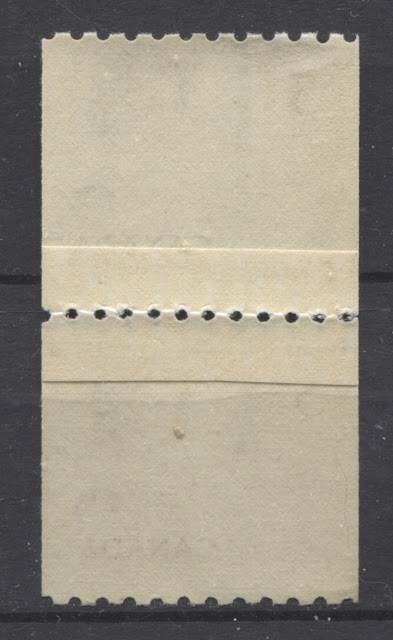
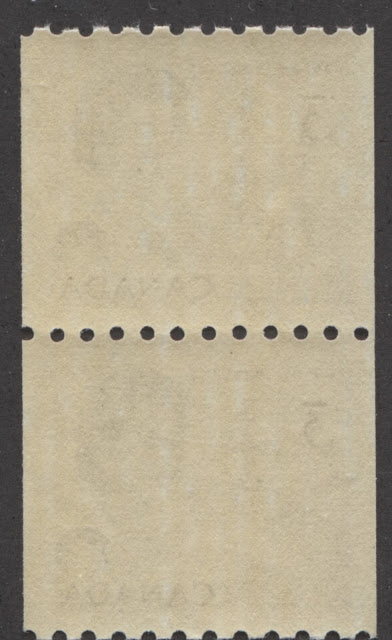
The scans below show the front and back of a typical repair paste-up:

Here, if you look carefully, you can see that two different strips, with completely different centering were joined together. There is no sign of accidental separation of the perforations, or accidental tearing, which would indicate the need for a repair. Rather, it looks as though two strips have simply been joined to form a larger strip.

Here is a rear view showing the gummed piece of paper that was used to join the two strips together. It would appear that this strip was again perforated after the two strips were joined together.
These repair paste-ups are listed by Unitrade, as pairs for all three values, and the precancelled versions of the 3c and 5c. Once again, they can exist for every other combination of variety listed for these stamps, including: gum varieties, spacing varieties, and paper varieties.
Start and End Strips
As explained in the introduction to this post, these first coils were the last printed by the CBN in rolls of 500 stamps, and were consequently the last to include a start strip and an end strip to each roll. The start strips and end strips can be confusing to those who do not have experience with them, but they are each different in appearance, and are fairly easy to distinguish once you know what to look for.
The first scan below shows a typical starter strip:
As you can see, there are 10 blank labels, which lead into the roll. The first label is shorter than the others and has a clean top edge. This is how you can tell that it is a start strip rather than an end-strip: the labels precede the stamps, rather than following the stamps.
Here we have an end strip of the 4c, consisting of 10 pale red tabs and 4 stamps. As explained above, the denomination "4 ct" is handstamped on the last label, in deep purple. The last label is longer than the others, which is the exact opposite to the case for the start strips.
Unitrade lists these as full strips, again for all three values, both precancels (3c and 5c) and the jump strips (to be explained). They do note that shorter strips are often found and that these are worth less than the full strips. Generally speaking, the full strips are quite difficult to find because they are very unwieldy and do not fit on an album page, which generally meant that they either were not saved at all, or they were broken into smaller strips that would fit on an album page.
Jump Strips and Pairs
A jump strip is one where the stamp impressions are out of alignment with one another, very, very slightly. On this issue, where the design is horizontal, that mis-alignment is in the horizontal direction. It occurs where the printing cylinder has completed a revolution and the next revolution does not start in the exact same place as they previous one ended. The result, is that the space between the straight edge of the coil and the design will be slightly narrower or wider, for part of the strip (or pair) than on the other part of the strip. The difference can be very difficult to see, even when you are looking for it. So it will almost certainly be overlooked unless you are looking for it.
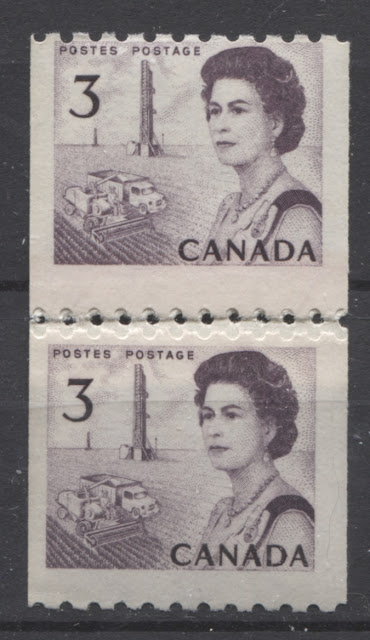
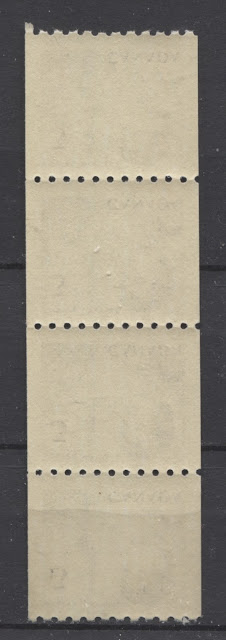
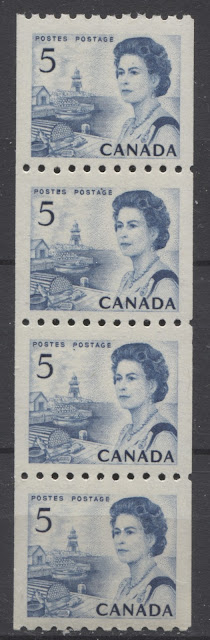
The scan below shows an example of a jump strip on the 5c blue:

It is very, very slight, but if you look carefully at this strip, you can see that the left margin of the top pair in the strip is very slightly wider than the left margin of the bottom pair. Here is a closer look:

Look at the width of the margin on either side of the perforations. You should be able to see that the top margin is wider than the bottom one. We are talking less than 1/2 mm of difference though, so it is very easy to miss. A good way to detect these is to take a clear ruler or the edge of an Instanta perforation gauge and line it up exactly with the edge of two stamp impressions in a strip. You should see that the edge will either miss the edge of the design on the other two stamps, or will cut into the design of those two stamps slightly. This will NOT happen on a normal strip.
Jumps will thus be a fairly regular feature in a complete roll, with as many as 20-30 in a roll. This is why they are not priced at a significant premium over the basic stamps. However, they are not as common as one might expect in practice though, because they were often destroyed when rolls were split into singles, as once you split a strip like this up, it ceases to show the jump and simply becomes 4 singles. You could still wind up with a jump pair, if the top and bottom stamps were detached from the strip, leaving the pair. But if the strip was split in the middle, you would lose the "jump". So the preservation of these "jumps" actually requires that they be found by examining a roll before it is split and then splitting it carefully.
Wide and Narrow Spacing Strips
The standard spacing between stamp impressions in the vertical direction is between 4 mm and 4.25 mm. Most pairs and strips are found with this spacing, but wider and narrower spacings can be found. Wide spacing is anywhere from 4.5 mm up to about 6 mm. Narrow spacing is usually between 3 mm and 3.75 mm.
Unfortunately I do not have an example of a narrow spacing strip that I can show here, though I will be sure to add one, as soon as one becomes available. I do however, have an example of a wide spacing strip of the 5 cent:

If you look carefully, you can see that the spacing between the middle stamps is slightly wider than between the top and bottom stamps. The spacing between the top two stamps and the bottom two stamps on this strip is 4 mm, whereas the space between the middle stamps is 4.5 mm.
These are caused by variations in the speed at which the paper web is fed through the press, as the printing cylinders turn. If more paper is fed between strikes of the cylinder, then a wide space will result. Conversely, if less paper is fed, there will be a smaller space between the impressions. My impression is that the narrow spacing is slightly scarcer than the wide spacing, but that could simply just be my perception, based on what I have in stock. These varieties can, of course, exist in conjunction with every other variety that exists on these stamps.
Paper Weave Differences
In other posts about this issue, I have talked about how the paper can be either vertical, or horizontal wove. Such differences can also be found on these coil stamps as well. Generally, the difference will be revealed by the direction in which the stamps bend with least resistance, or the direction in which they naturally curl. As stated before, stamps on horizontal wove paper will curl from top to bottom, while those on vertical wove will curl from side to side.
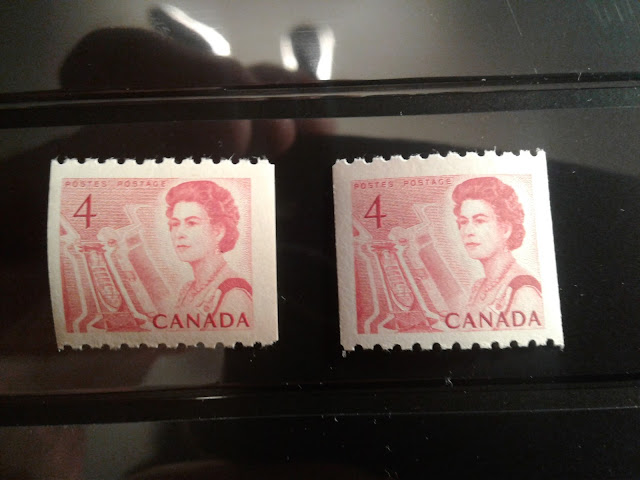
The picture below shows two 4c stamps that illustrate these two differences:

As you can see, the stamp on the left is curling slightly from top to bottom, and so is printed on horizontal wove paper. The one on the right is curling slightly from side to side, and thus it is printed on vertical wove paper.
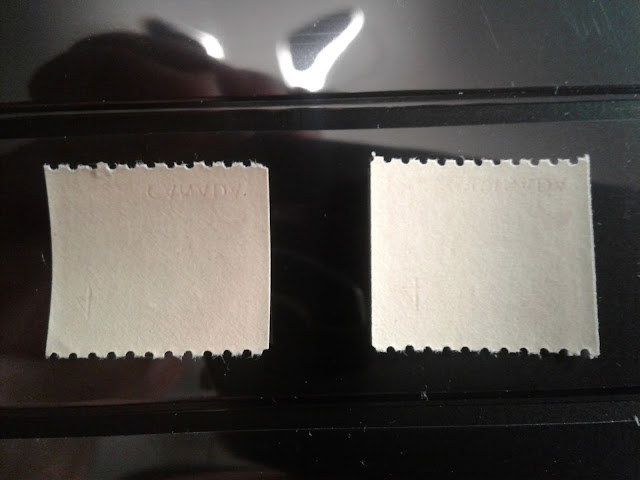
Here are the differences as seen from the back of these stamps:

As far as I know, all three values can be found on both types of paper.
Paper Fluorescence

Unitrade lists all three of these stamps as being printed on either dull fluorescent, or low fluorescent paper with fluorescent flecks. In reality, the paper is a bit more complicated than this. Usually, the paper will contain at least 1 or 2 fluorescent fibres, although dull fluorescent papers do exist that contain no fluorescent fibres at all. The density of these fibres and their brightness varies from 1-2 fibres, to a sparse concentration, evenly distributed across the surface of the entire stamp. Generally speaking, I tend to classify stamps with 1-2 fibres, or very few fibres (i.e. less than 10) as being the standard dull fluorescent paper, and those with more as being the low fluorescent.
In addition, the colour of the paper under UV also varies as well, from grey, to greyish white, to a bright bluish white. The above picture shows some of these differences, with the stamps in the top row appearing greyish white, the end stamps on the bottom row being greyish, and the stamp in the middle being a bright bluish white. As you can see, the inks are basically non-transformative, in that they appear the same basic colour under UV as in normal light.
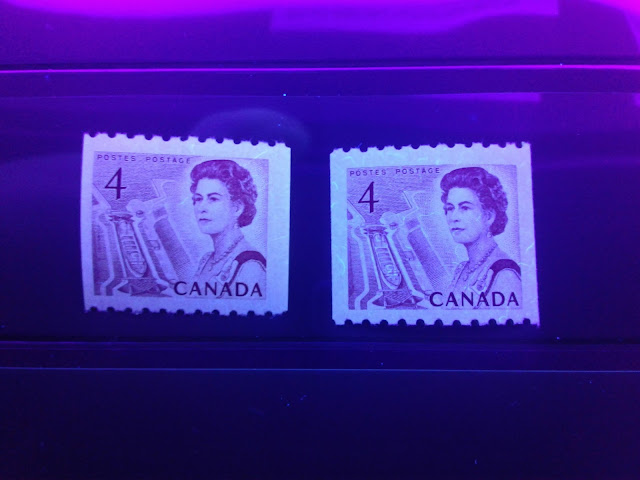
The above picture does not show the fluorescent fibres in the paper very clearly, but this next picture does show this better:

The stamp on the left shows just a couple of fluorescent fibres at the top right, whereas if you look carefully and the right stamp you can see many more fibres in the paper. In addition, the ink on the left stamp appears brighter red under UV than the ink on the right stamp, which appears quite dark. Notice how the paper on the right stamp appears greyish, while the paper on the left stamp appears greyish white.
Gum
The gum on all of these first three coils is dextrose, but the appearance of the gum does vary:
- There is a smooth, yellowish gum that has a satin sheen.
- There is a smooth, yellowish gum that has a streaky appearance.
The scans below show the different appearance of these two gum types:

Here is the smooth, yellowish dextrose gum. Note how there are no visible blemishes anywhere on the gum, and how the gum appears to be of even thickness and application.

Here is the streaky dextrose gum. Here you can see clear streaks where the gum is thinner than normal.
As far as I can tell, all of the values exist with both types of gum, but it is not clear whether both types exist with all combinations of paper fluorescence, or horizontal and vertical wove paper. I would assume, in the absence of evidence to the contrary that all varieties of these stamps, exist with both types of gum, although it is possible that some varieties may exist with one type, but not the other.
Perforation
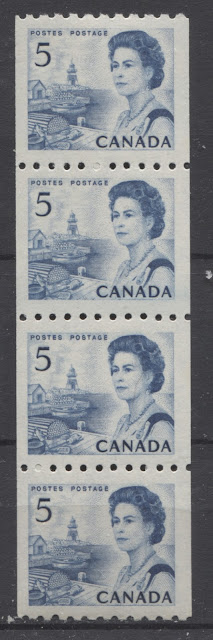
The perforation used for these first three coil stamps is line 9.4, horizontally, which is quoted in the standard catalogues as 9.5 horizontally. I have not found any variation in the size of this perforation. However occasionally, strips can be found in which the perforation pins are seen to be out of alignment, as shown in the following strip:

On this strip, only the top row of perforations is completely straight and aligned. On the second row, all of the perforations except for the third one are aligned. The third perforation hole appears just slightly above the others. Finally, the bottom row has all of the perforations aligned except for the fourth perforation from the left, which appears lower than the others.
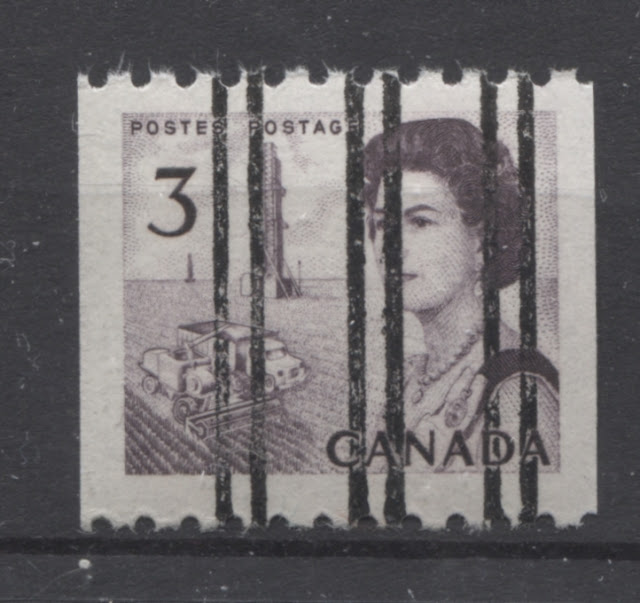
Precancels

Only two values from this issue exist with precancels, and there is only a single style: three sets of vertical parallel bars as shown above. The two values so found are the 3c and 5c. I haven't found any significant varieties in the precancel, except that sometimes the bars appear rougher and less solid on some stamps as compared to others. Unitrade lists the basic precancels on these two values, but it should be borne in mind that any variety of the 3c or 5c discussed so far could exist with a precancel.
Plate Varieties
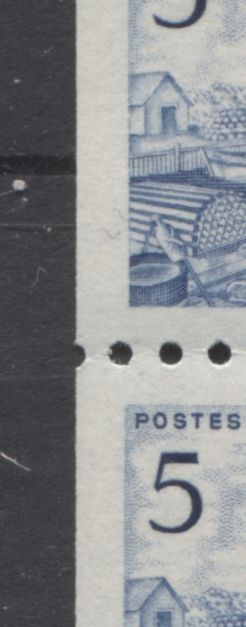
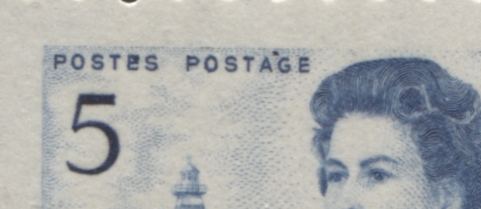
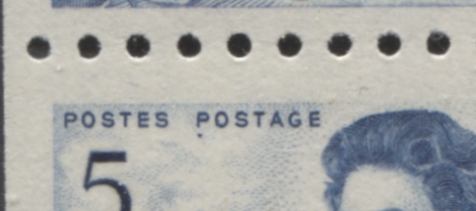
There are no plate flaws or varieties listed n Unitrade for any of the coil stamps. However, in my stock, I have found one strip of the 5c in which two stamps show prominent dots near the inscription that can best be described as "dot above AG of Postage" and "dot below P of Postage". These two varieties appear on the middle two stamps in the strip below:

Here is a close-up of the dot above "AG":

Here is a close up of the "dot below P".
As you can see, these are quite prominent for Centennial varieties. I do not know whether or not these are constant though, and I would have to study a full roll to see if I could find another example. Regardless of whether or not the variety is constant, it is sufficiently interesting to include in a specialized showing of these stamps.
Colour Shades
I have found very little variation in colour among the stamps that I have in my stock, though I would suspect that with enough searching it should be possible to find at least one shade variety of each value. I will say that compared to the sheet stamps:
- The 3c is generally a bit darker in colour.
- The 4c is a little brighter, and
- The 5c is a brighter blue than most of the sheet stamps of this value.
As I have alluded to earlier, the inks under UV light are generally non-transformative and appear more or less the same basic colour, adjusted for the addition of purple, from the UV light, as they would appear in normal spectrum light.
Bringing It All Together
If you are forming a specialist collection, you will have to decide whether or not a single illustrative example of each variety will suffice for your collection, or whether you wish to seek out every permutation and combination of variety you can find. In the later case, you will find that there can be a very large number of items on your want list indeed. To illustrate this, consider that:
- There are anywhere from 4 to 6 different types of fluorescence.
- There are horizontal and vertical wove papers.
- There are two types of dextrose gum.
- Jump strips and normal strips exist.
- Start and end strips exist.
- Cutting guide line strips exist.
- Wide, narrow and normal spacing strips exist.
- Precancels exist on the 3c and 5c
If we assume that you only collect strips, that there are only 4 levels of fluorescence, that there is only one shade for each value and that the start and end strips do not exist with either the jumps or the spacing varieties, then:
The number of possible start and end strips: 5 x 2 x 4 x 2 x 2 = 160 strips.
At $100-$500 catalogue per strip, you can see that completing this will require a lot of money over time.
The number of other strips is: 5 x 4 x 2 x 2 x 2 x 2 x 3 = 960 strips!!!
Again, if the least expensive strip is $10 and the average is say $20, it will cost you close to $18,000 to find and acquire all of these strips, assuming that you can find them all
The Metric Issue
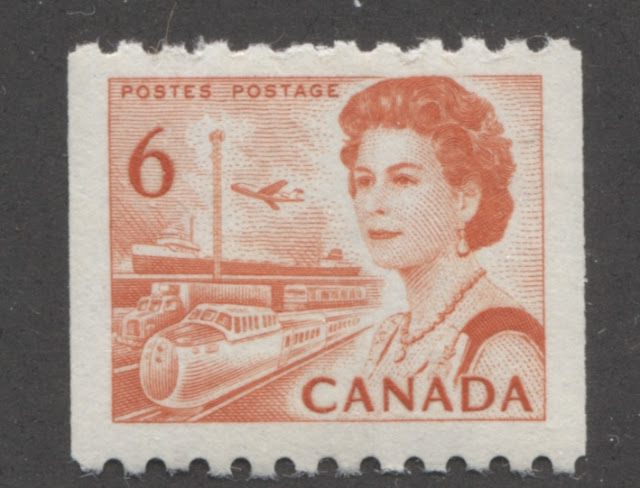
The metric designs were issued as the first class postal rates increased between 1969 and 1971 as indicated below each value. Again, the total quantity issued is not known, but the quantities of these coil stamps is much greater than for the imperial sized stamps. The 6c transportation design uses the CBN version of the die, which was die 1a. Unitrade does not note this specifically, but given that the 6c sheet stamp of this dies was printed by CBN, it should be apparent that the CBN printed coil stamps will have been produced from this same die as well.
The Basic Designs

6c orange - January 1969

6c black - August 1970

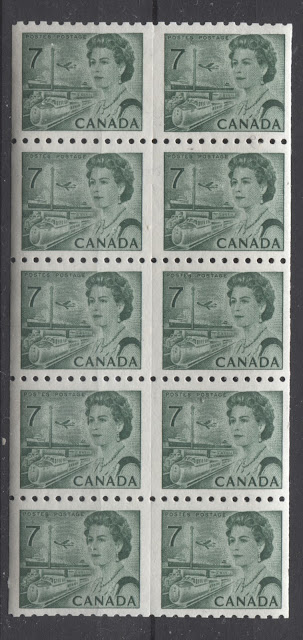
7c deep emerald green - June 30, 1971

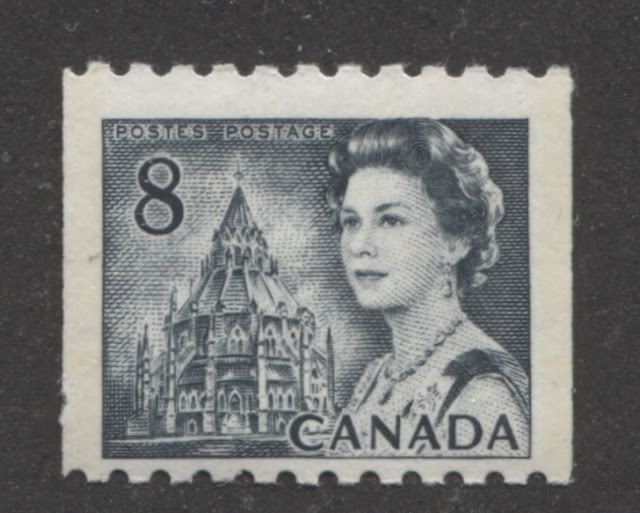
8c slate - December 30, 1971
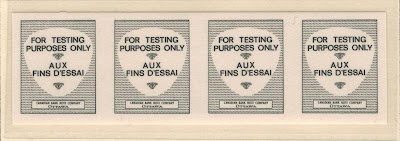
The CBN Test Coil
With the introduction of the metric sized coils, the post office started to promote the sale of complete rolls to the public by offering free plastic dispensers to go with these rolls. In order to test the dispensers to ensure that they displayed the coil stamps properly and would dispense them efficiently, the CBN produced test coils as shown above. These black and white labels exist perforated, and imperforate, with dextrose gum, and with PVA gum, though Unitrade notes that the PVA gum examples are rare. These were used with the 6c orange stamp for testing purposes and take the place to the blank labels in the roll, so that start strips with these labels attached can be found for the 6c orange, though again, they are quite scarce.
As noted in Unitrade, misperfs exist where the perforations bisect one or more of the labels.
I have never been in a position to study the paper fluorescence of these test labels, but I would assume that they can be found on either hibrite or dull fluorescent paper.
Jump Strips and Pairs
As was the case with the imperial sized stamps, the four values of this issue can be found in jump strips as well, though they are scarcer for this issue. Unitrade states that the jumps are smaller, though I have found them to be just as subtle as those on the imperial sized stamps.
The scan below shows a jump strip of the 7c deep emerald green:

I actually find the jump easier to spot on this strip as compared to the 5c strip that I showed previously. It is easiest to see if you look at the width of the margin on the left side just above the middle perforations as compared to the width of the margin just below that.
Here is a closer look"

Notice how the margin at the top is narrower on the left side and wider on the right side as compared to the stamp below it.
As was the case with the previous issue, the jump strips can exist in conjunction with any other variety discussed here.
Wide and Narrow Spacing Strips
The standard spacing between stamp impressions for this issue varies, unlike for the imperial sized stamps. On the 6c, the standard spacing is 4 mm to just under 4.25 mm. 4.5 mm to 6 mm is considered wide spacing, while 3 mm to 3.75 mm is considered narrow. On the 7c and 8c, though, the standard spacing is much narrower at 3.5 mm - 3.75 mm. On these values 4 mm is considered wide spacing, while 3-3.25 mm is considered narrow.
Unitrade notes that the spacing varieties on this issue are scarcer then they are on the previous issue, and that this is likely due to the smaller size of the rolls used to produce them.
I have an example of both a wide spacing and a narrow spacing strip of the 7c deep emerald green:
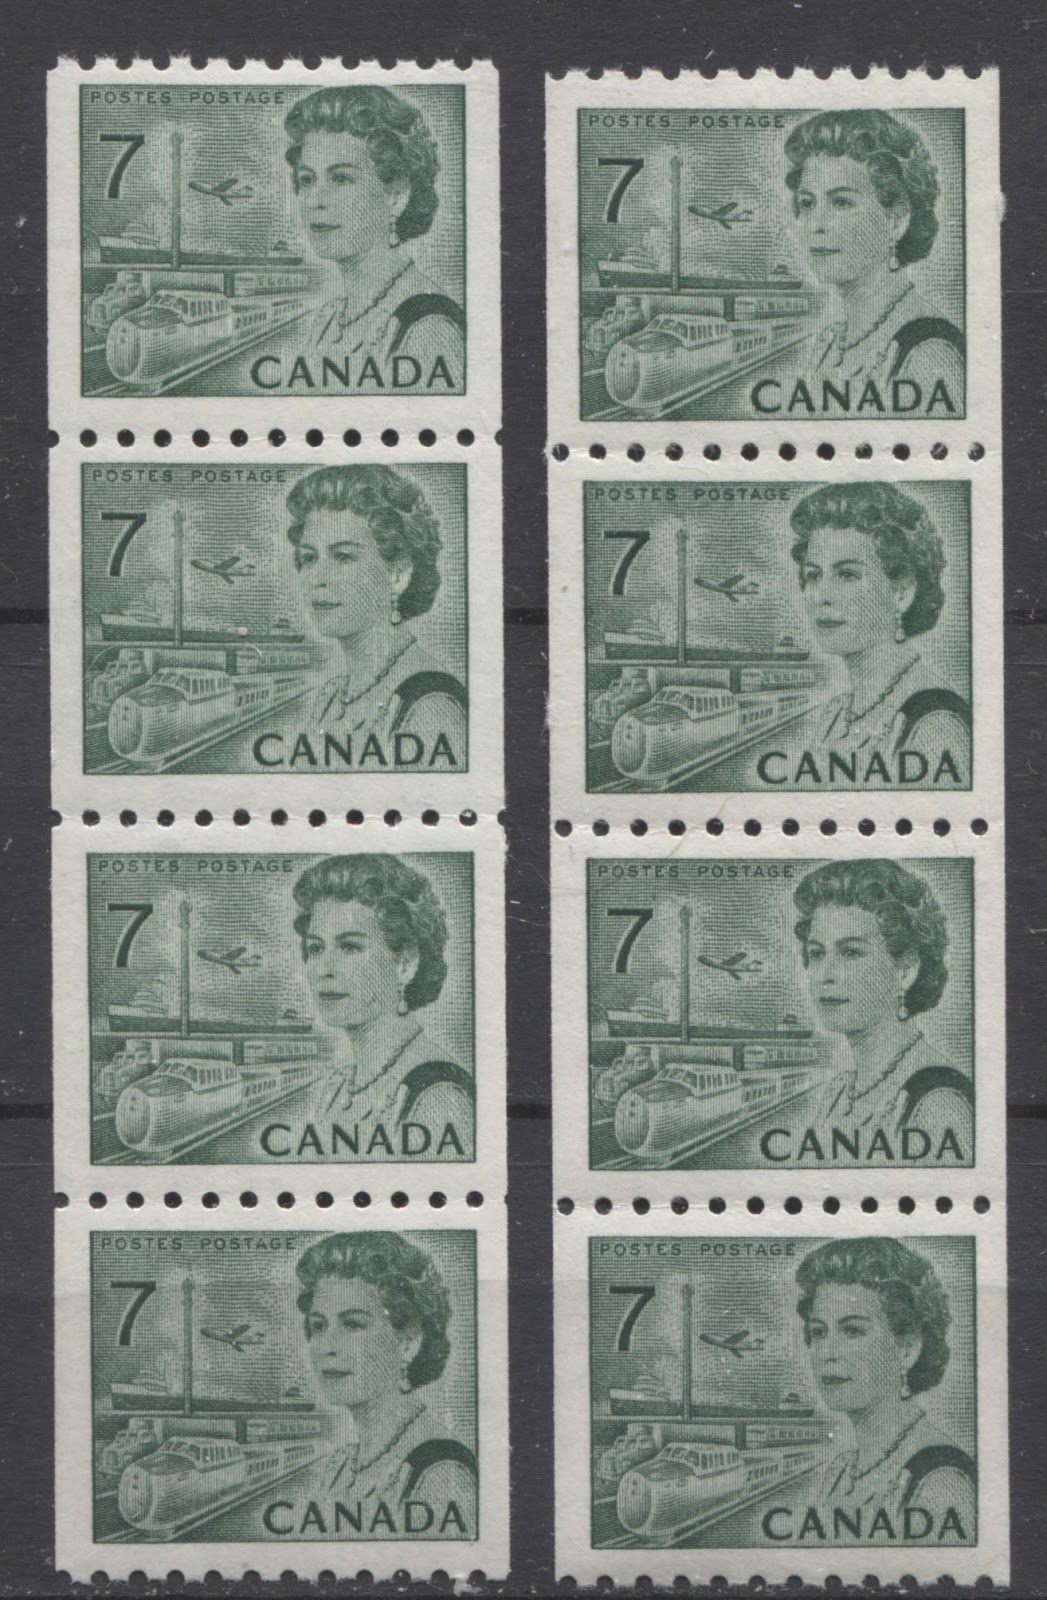
The strip on the left side is a wide spacing strip, in which the spacing between the middle stamps is noticeably wider than between the other stamps in the strip. The strip on the right is a narrow spacing strip, in which the spacing between the top two stamps is narrower than the other stamps in the strip.
Again, these varieties can or should exist in conjunction with every other variety discussed here.
Paper Weave Differences

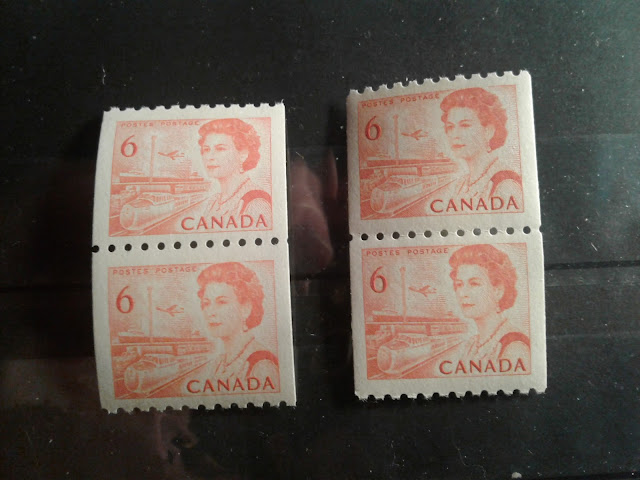
Like the previous issue, the 6c orange, 6c black and 7c deep emerald green, exist printed on both vertical and horizontal wove papers. It would appear to me, from my limited exposure to the 8c coils that these may exist on both papers as well, although all the examples I have seen thus far are printed on vertical wove paper.
The above picture shows two pairs of the 6c orange, with the left pair being clearly printed on horizontal wove paper, from the fact that it is curling from top to bottom. The right pair is curling slightly from side to side, and is clearly on vertical wove paper.
Paper Fluorescence
Unitrade lists 6c orange as being either on dull fluorescent or hibrite paper. The 6c black and 7c deep emerald green are listed only on hibrite (HB) paper, and the 8c is listed on a variety of papers from dull fluorescent to high fluorescent. The reality though is quite a bit more complicated than this as we shall see.
The scan below shows the basic difference between the appearance of the dull fluorescent and hibrite papers of the 6c orange, as seen under a UV lamp:

Clearly, there is no mistaking the two. The ink of the HB, like most other HB printings appears almost black, so I would classify it as a transformative ink. The dull paper looks deep orange red under UV and they paper is greyish. Thus the ink for this printing is non-transformative.
Within the dull fluorescent category though, there are at least two varieties:
- dull fluorescent greyish.
- dull fluorescent greyish white
Occasionally these can be found with 1-5 fluorescent fibres in the paper, making for four basic varieties of dull paper. The picture below shows the difference between dull fluorescent greyish and dull fluorescent greyish white:

The greyish white strips are shown on the left and second from right, while the other two are greyish.
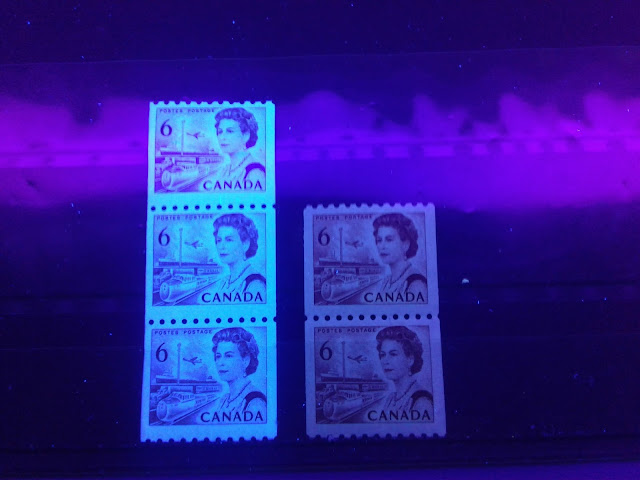
Within the classification of HB paper, there are differences too. Look at the picture below:

The pair on the left is a 6c orange pair, the next pair and the strip are the 6c black. The only true hibrite in this group is the second pair from the left. The others are all high fluorescent, rather than hibrite. Yet, unitrade only lists the 6c black and the 7c as being on hibrite paper. So I would say that:
- The 6c orange exists both HF and HB.
- The 6c black exists both HF and HB.
- The 7c exists both HF and HB.
Unitrade lists 5 different papers for the 8c slate:
- dull fluorescent
- low florescent flecked
- medium fluorescent
- fluorescent, which is mid way between low and medium fluorescent.
- high fluorescent
However, the paper types are bit more complicated as most papers will show some fluorescent fibres, whose density will vary from just a few, to a sparse, overall even distribution across the stamp. The high fluorescent paper so far is the only one I have seen where there are no visible fibres. The dull fluorescent comes both with and without fibres, while low fluorescent, medium fluorescent and fluorescent all have some fibres.
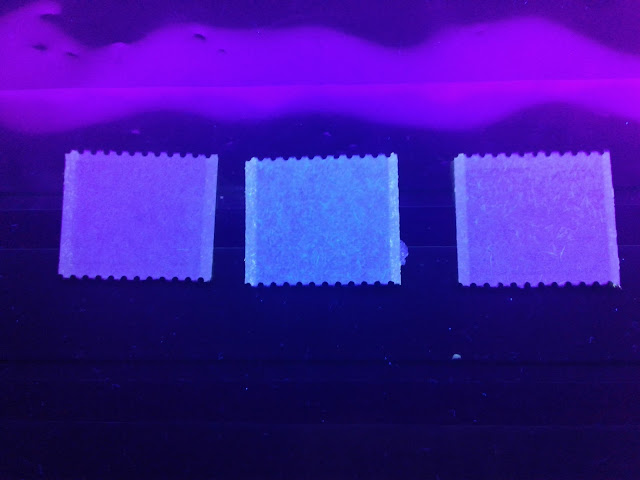
The photographs below of some singles and strips, as seen under UV light illustrate some of these differences:

From left to right we have:
- Dull fluorescent paper with no fluorescent fibres.
- Medium fluorescent paper with sparse fluorescent fibres.
- Low fluorescent with very sparse fluorescent fibres.

Here we have the dull fluorescent paper with a very sparse concentration of low fluorescent fibres visible on the paper on the left. On the right is the high fluorescent paper.
According to Unitrade, the untagged stamp exists only with fluorescent or dull fluorescent paper, while the tagged coil exists with all five types of paper.
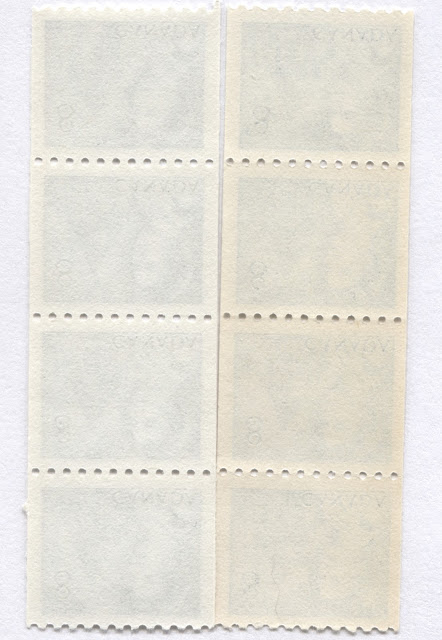
Paper Colour
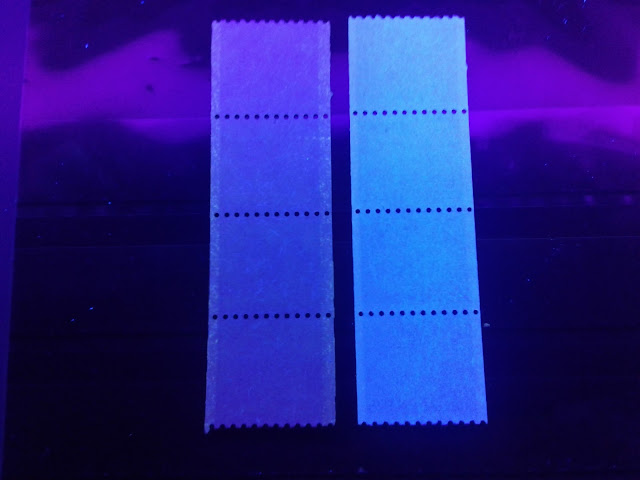
In addition to giving different reactions under UV light, the papers found on the 8c appear different when viewed against a white background:

As you can see, the strip on the right appears a distinct cream colour, compared to the strip on the left, which is much whiter. The cream coloured paper tends to be the dull fluorescent and low fluorescent papers, while the whiter paper is generally at least fluorescent, medium fluorescent or high fluorescent.
Gum
The gum found on the 6c orange, 6c black and 7c deep emerald green is always dextrose. On the 6c orange, and 7c the two types of gum discussed before, the smooth and streaky gum are found. The 6c black however, is found with both types as well as a third type not discussed here so far. I call it the blotchy dextrose. It has the appearance of having been sponged onto the back of the stamp. I would illustrate it here, except that the characteristics I am describing cannot really be seen in a scan.
The 8c is found only with colourless PVA gum that has an eggshell sheen. It is very different from the PVA gum found on the BABN booklet stamps, but very similar to the PVA gum found on the other sheet stamps.
So basically, all the values except for the 8c can be found with two or three types of gum.
Tagging
Unitrade lists these stamps as existing with general tagging, although no other information is provided. As it turns out, two different types of tagging can be found:
- 4 mm wide tagging, which appears green under UV.
- 3 mm wide tagging, which appears extremely bright yellow under UV.
It is not entirely clear, but the 4 mm tagging appears to be OP-2 tagging, as there is no evidence of migration through the stamps that I looked at. However, given that these were issued on December 30, 1971, there must have been at least some tagged with OP-4. So I think the 4 mm tagging is actually OP-4, while the 3 mm is OP-2. I am basing my conclusions on the colour and width of the tagging, since 4 mm tags on this issue usually are OP-4, while the 3 mm bright yellow tags are definitely OP-2.
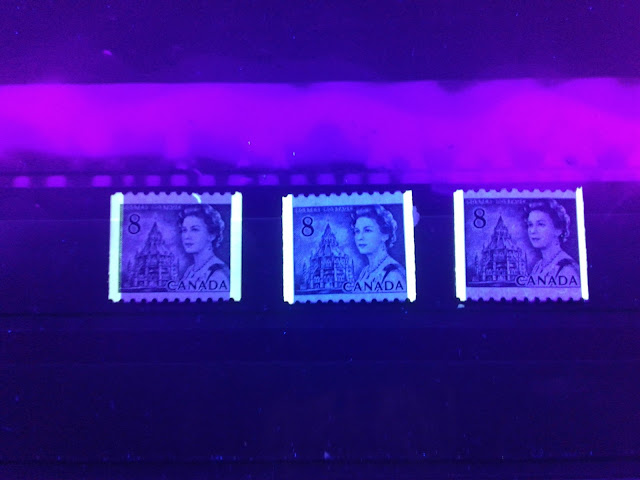
The picture below shows these two types of tagging:

The stamp on the left is tagged with 4 mm OP-4, while the other two stamps are OP-2. The OP-4 stamp shows an interesting "hook tag flaw" in the upper margin, which may or may not be constant. The easiest way to distinguish these two types is by the fact that with the 4 mm tagging, some of the tag bars will appear on the design and the tagging appears green under UV. With the OP-2, the tagging is generally confined to the margins. The only problem with identifying the tagging using these tests is that the tests will fail where the tagging is significantly shifted to the left or right.
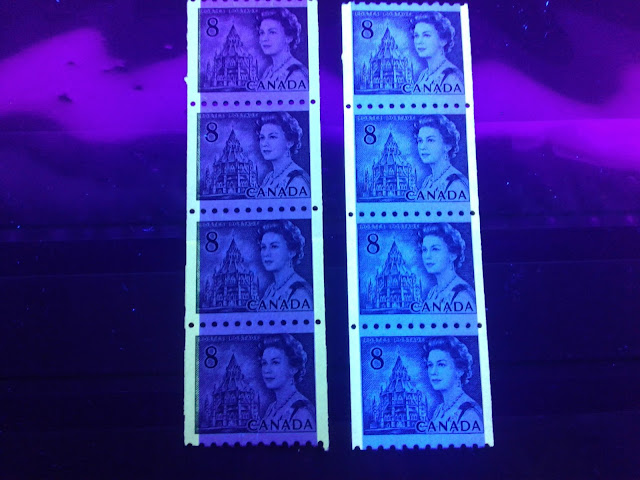
Here is another view of two strips, with the left having the OP-4 tag, and the right strip having the OP-2 tag:

A better way to identify these two types is by the spacing between the bars. Generally the 3 mm tagging will have an extra 1 mm of space between the tagging bars as shown in the picture below:

Notice how the edges of the tag bars are aligned at the left, but not at the right.
It makes sense that both types of tagging would exist, given that this coil was not replaced by the 8c Caricature until April 1974. Generally speaking, the whiter, brighter fluorescent papers are from 1973 and 1974, and should exist only with 3 mm OP-2, while the duller papers will be from 1971-1973 and should exist with both types of tagging.
Paper Texture
In addition to the smooth papers discussed above, the 8c is known printed on a paper that shows a distinct horizontal ribbing.
Perforation
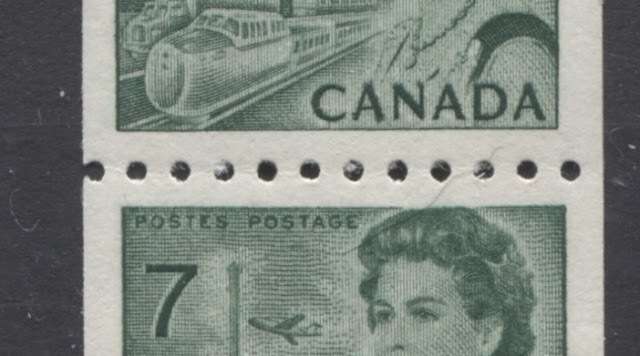
The perforation used for this issue was slightly finer, being line 9.9 instead of the earlier 9.4. Again, the standard catalogues round this measurement up to 10. As with the previous issue, I have not found any significant varieties in the size of the perforation, but Unitrade does not that all of the coils from this issue can be found double perforated. However, great care must be exercised when buying double perforated varieties, since they can be easily faked. Another variety that can be found is strips where one or more peroration holes are completely missing, as shown with the strip below:

Notice how the upper right perf on the bottom stamp is completely missing from the strip.
Precancels
None of the stamps of this issue are known precancelled, unlike the earlier imperial sized stamps.
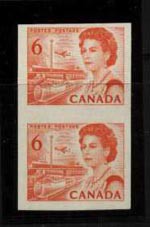
Imperforates
All four of these stamps, plus at least two varieties of the tagged 8c are known completely imperforate. They are all very rare, and list in Unitrade for between $400 and $4,000 (6c orange hibrite)
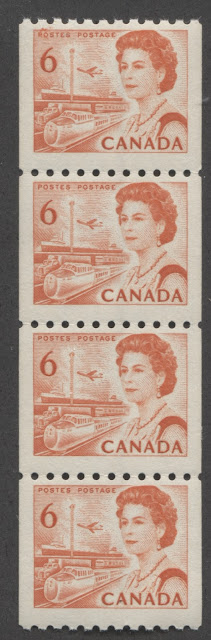
An example of the most common pair, the 6c orange, is shown below:
Phantom Imperforates or Unsevered Blocks
Because these coils were issued as tubes which were then broken off into rolls, occasionally it is possible to find instances where two rolls did not separate properly because the score lines were either too weak, or because they were unrolled together rather than being snapped apart, This produces partial imperf blocks like the one shown below:

In this case, the score-line is very clearly visible, and so this block is really just a novelty to show how these coils were printed. However, it is possible to find blocks with little to no trace of any scoreline. These are quite a bit more desirable, and worth a significant premium over the price of ordinary stamps.
Colour Shades
I have not found any significant differences in shade on these stamps, except possibly on the 6c, where at least two shades of orange can be found. I do believe though with patience that one could turn up at least two shades of the 8c and 7c.
Plate Flaws
Again, there are no listed plate flaws on any of these four stamps. However, I have found a number of strips of the 6c orange that seem to show a constant, or semi-constant ink smudge on the design.
The strip below is one such example that shows the smudge in the margin, between stamps 1 and 2, just above the "T" of "Postes"

Here is a closer view:

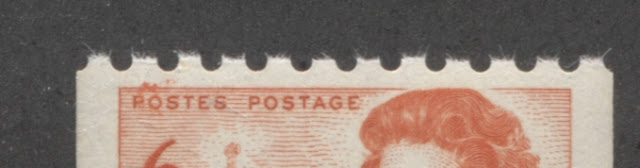
This next strip shows a similar flaw, but this time it is on the first stamp, just above the "PO" od "Postage". I have found several other strips with the smudge in approximately the same place, which leads me to wonder if it is a constant or semi-constant flaw:

Here is a closer view:

Bringing it All Together
Again, like the imperial sized stamps, there can be a very large number of collectible varieties if you wish to obtain every possible permutation and combination of variety. The approximate number of possible strips that you could potentially collect for each value is as follows:
- 6c orange: 6 x 3 x 2 x 2 x 2 x 2 = 288 strips.
- 6c black: 2 x 3 x 2 x 3 x 2 = 72 strips.
- 7c deep emerald green = 2 x 3 x 2 x 3 x 2 x 2 = 144 strips.
- 8c slate untagged = 2 x 3 x 2 x 2 x 2 = 48 strips.
- 8c slate tagged 5 x 3 x 2 x 2 x 2 = 120 strips.
So without considering the unsevered blocks or imperforate pairs, you could easily collect close to 700 different coil strips of these four stamps.
This concludes my discussion of the coil stamps and brings me to the end of my series of posts dealing with the fundamentals of the physical attributes of the stamps. I was going to deal with the postal stationery next week, which is a whole other field. Unfortunately I do not have enough illustrative examples of the envelopes and post cards to cover it thoroughly. But I will discuss it anyway and will provide examples where I can. Then as I acquire more pieces, I can provide additional scans. Once this is done, I will be ready to start my series of posts dealing with each denomination and listing all known varieties.